
For a newbie (such as myself) installing Arch Linux can be very painful experience. The arch linux wiki is very good and covers all the aspects. Though I would suggest anyone wanting to install arch for the first time to read the Beginner's Guide rather than reading the Installation Guide. The Installation Guide is basically a cheat sheet for more adept users who just need some reminder on the how-to's. When I first read the installation guide I was just clicking all the links to figure out what I need to do. On the other hand, the beginners guide covers everything with the basics.
However, this can also be a drawback. The beginners guide have so much information that you might get side tracked. Or, you might miss a step which needs to be followed to install arch. So, I thought it's better to make my own cheat sheet.
 A simple understanding of how linux work, or the component which makes up a fully interactive linux environment is a plus for this type of installation. As I mostly used Ubuntu, I didn't have a good understanding of the components at work. But after I was able to install arch, I got a good idea about them.
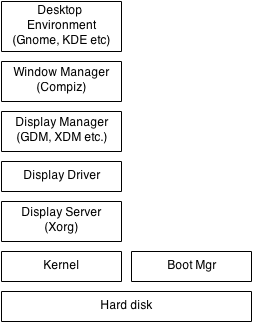
The image on the right shows the components we need to be aware of. To install arch, we need to start from below. First we need to partition the hard disk. Then we will install the arch linux kernel. After that, we will install a Display Server. Then, if we don't want to use the default display drivers, we need to install the display drivers. After that, we will install the Desktop Environment. This will automatically install a Desktop Manger and Window Manager.
So, we need to follow these steps to install arch. Now, let's talk about them in more details.
So, I followed the other instruction given in the link above to create the disk. Since, I was using Ubuntu, I just opened up a terminal and created the live USB with the following command -
Now we can use the media to boot to arch linux.
For the most basic setup, the hard disk need only two partition - one is root /, and the other is boot partition. For MBR partitioning style, only one partition (root) is enough.
Partitioning can be done using any of the available tools, here we will use cgdisk. cgdisk is a GPT partitioning tool. We can startup cgdisk using the following command.
If the drive is not partitioned, there will be only one entry in the partition list with partition type unallocated. By selecting the entry and selecting [New] command from below we can start creating partitions. We will create three partitions - first one is for boot (for BIOS boot, code is ef02 and for EFI boot, code is ef00), second one for swap (code is 8200) and the last one for root (code is 8300). After we finish creating the partition, the screen will look something like below -

We have to make sure to "write" the partition information before quitting cgdisk or we have to do it again.
For wireless/wifi connection we have to first know the name of the wireless card. We can check it using -
Then we will set the hardware clock mode -
For intel -
After this we can reboot to log into our installed Desktop Environment.
For better power management we can install TLP which works out of the box.
However, this can also be a drawback. The beginners guide have so much information that you might get side tracked. Or, you might miss a step which needs to be followed to install arch. So, I thought it's better to make my own cheat sheet.
A simple understanding of how linux work, or the component which makes up a fully interactive linux environment is a plus for this type of installation. As I mostly used Ubuntu, I didn't have a good understanding of the components at work. But after I was able to install arch, I got a good idea about them.
The image on the right shows the components we need to be aware of. To install arch, we need to start from below. First we need to partition the hard disk. Then we will install the arch linux kernel. After that, we will install a Display Server. Then, if we don't want to use the default display drivers, we need to install the display drivers. After that, we will install the Desktop Environment. This will automatically install a Desktop Manger and Window Manager.
So, we need to follow these steps to install arch. Now, let's talk about them in more details.
1. Creating a Installation Media
So, we need to first download the iso of Arch from their site. Than we can just burn the image to a disk. I myself, however, prefer creating a bootable USB from the iso. So, I created a bootable USB from the iso using UUI. But turns out, this have some issues and so the system doesn't boot from the USB.So, I followed the other instruction given in the link above to create the disk. Since, I was using Ubuntu, I just opened up a terminal and created the live USB with the following command -
dd bs=4M if=/path/to/archlinux.iso of=/dev/sdx && syncDon't forget the sync command at the end. If you miss it, arch might not boot from the USB correctly. The first time I tried making the USB, it didn't work correctly.
Note: This command will erase everything on the USB disk. So make a backup of the drive before running the command. Also, it is better to format the drive to FAT32 if it's in any other format.
Now we can use the media to boot to arch linux.
2. Partitioning The Hard Disk
We can partition the hard disk using MBR or GPT partitioning style. I prefer GPT as it is newer and has some advantages over MBR. More information on them can be found here.For the most basic setup, the hard disk need only two partition - one is root /, and the other is boot partition. For MBR partitioning style, only one partition (root) is enough.
Partitioning can be done using any of the available tools, here we will use cgdisk. cgdisk is a GPT partitioning tool. We can startup cgdisk using the following command.
cgdisk /dev/sdaIf the disk is already partitioned using MBR or not partitioned at all, it will ask to convert the disk to GPT partition. Pressing enter will convert the disk to GPT partition and show a list containing the partitions available in the hard disk. You can select partitions using up/down keys and select actions using left/right keys from the keyboard.
If the drive is not partitioned, there will be only one entry in the partition list with partition type unallocated. By selecting the entry and selecting [New] command from below we can start creating partitions. We will create three partitions - first one is for boot (for BIOS boot, code is ef02 and for EFI boot, code is ef00), second one for swap (code is 8200) and the last one for root (code is 8300). After we finish creating the partition, the screen will look something like below -
Note: Though in the Beginners' Guide, it is said that for BIOS boot we don't need any boot partition, but I couldn't boot to arch without creating a BIOS boot partition (code ef00).
We have to make sure to "write" the partition information before quitting cgdisk or we have to do it again.
3. Mounting the partitions
After creating the file system we have to format and mount them. Assuming our hard drive is /dev/sda, we have invoke the following commands to format and mount the file systems -mkfs.ext4 /dev/sda3 mount /dev/sda3 /mnt mkfx.fat -F32 /dev/sda1 mkdir /mnt/boot mount /dev/sda1 /mnt/bootWe also have to make the swap partition -
mkswap /dev/sda2
swapon /dev/sda2
4. Connecting to Network
For wired connection the system should automatically connect to a dhcp network. Nothing further needs to be done. For connecting to a static IP network it's best to refer to the Beginners' Guide.For wireless/wifi connection we have to first know the name of the wireless card. We can check it using -
ip linkNow we can connect to the wifi network using -
wifi-menu <card name>Now, we need to follow the instruction and provide the asked information to connect to a wifi network.
Note: If there's only on wifi network card in the machine then invoking wifi-menu without parameter will default to that one card.
5. Installing Arch Kernel
Now we will install the base kernel using the following command -pacstrap /mnt base base-develThis will install all packages from base and base-devel group. To customize what packages will be installed we can use -i flag with pacstrap. This will prompt to select the packages we want to install.
6. Creating file system table
The file system table defines how the partitions will be mounted in the system. To generate it run the following command -genfstab -U -p /mnt >> /mnt/etc/fstab vi /mnt/etc/fstab
Note: It is recommended to open and check the generated fstab file
7. Configure Base System
After this, we need to configure the base system. For that we need to chroot to the system -arch-chroot /mnt /bin/bash
Configure Locale
Now we will configure system locale. We have to open /etc/locale.gen file and uncomment the line en_US.UTF-8 UTF-8. Then we will run the following command to generate locale.locale-genThen we will create /etc/locale.conf -
echo LANG=en_US.UTF-8 > /etc/locale.confAnd we will set the LANG variable -
export LANG=en_US.UTF-8
Configure Time
We will create a symbolic link to our subzone using the following command -ln -s /usr/share/zoneinfo/Zone/SubZone /etc/localtimeWe have to change Zone and SubZone with our zone information.
Then we will set the hardware clock mode -
hwclock --systohc --utc
Set Hostname
We can change the machine hostname by -echo host_name_here >> /etc/hostname
8. Install CPU Microcode
For intel based cpu's we have to install the microcode update (this is optional, we can run the system without microcode update). It is better to install it before installing boot loader because some boot loaders (such as grub) can load microcode at boot.pacman -S intel-ucode
9. Install Network Components
For wired connection we don't need to do anything. We just have to configure the network again as above after restarting the system. For wireless connection, we need to install some packages to be able to connect as we did before -pacman -S iw wpa_supplicant dialogAfter this we can connect to wifi network using wifi-menu.
10. Install Boot Manager
We will install grub as it automatically loads intel-ucode. We have to run the following commands to install and configure grub -pacman -S grubTo configure for EFI (64 bit)-
grub-install --target=x86_64-efi --efi-directory=$esp --bootloader-id=arch_grub --recheckTo configure for BIOS -
grub-install --target=i386-pc --recheck /dev/sdaThen we need to create grub.cfg for both case -
grub-mkconfig -o /boot/grub/grub.cfgAfter this we need to reboot the computer and log into our newly installed OS for further installation process. To unmount the partitions and reboot -
umount -R /mnt
reboot
11. Install Display Manager
After rebooting we will find ourselves in a arch linux kernel. Now we have to install the Graphical user interface. For that we have to first install a Display Manger. The most common display manager is Xorg which we can install using -pacman -S xorg-server xorg-server-utils
Note: Before we can install anything we need to connect to network using the methods discussed previously.
12. Install Display Driver
We can use the default driver if we want. But we can also install vendor provided drivers.For intel -
pacman -S xf86-video-intel libva-intel-driver libva lib32-mesa-libglFor ATI -
pacman -S xf86-video-ati mesa-libgl lib32-mesa-dri lib32-mesa-libglFor NVidia the process varies for models. So it's better to visit Arch Wiki for installation instructions.
Note: To be able to install lib32-mesa-libgl in x64 system we need to enable multilib. We need to uncomment the [multilib] section in /etc/pacman.conf and then update the package list pacman -Syu
13. Install Desktop Environment
Now, we are ready to install the actual Desktop Environment. To install GDM -pacman -S gnome gnome-extraThen we need to set up GDM to start at system boot -
systemctl enable gdmTo install other Desktop Environments we can refer to Arch Wiki.
After this we can reboot to log into our installed Desktop Environment.
14. For Laptops
If we are installing arch in laptop, we have to install touchpad driver to make it work.pacman -S xf86-input-synapticsAfter installing driver we need to restart the laptop.
For better power management we can install TLP which works out of the box.
pacman -S tlp
15. Misc
The sound driver should work out of the box. However, to be able to play music we might need to install Codecs. GStreamer is a good codec which can be installed using -pacman -S gstreamerHowever, the old version of GStreamer is still widely used. So we can also install the old version using -
pacman -S gstreamer0.10
No comments:
Post a Comment