" Vim compiler file
" Compiler: Microsoft Visual Studio C#
" Maintainer: Chiel ten Brinke (ctje92@gmail.com)
" Last Change: 2013 May 13
if exists("current_compiler")
finish
endif
let current_compiler = "dotnet"
let s:keepcpo= &cpo
set cpo&vim
if exists(":CompilerSet") != 2 " older Vim always used :setlocal
command -nargs=* CompilerSet setlocal
endif
CompilerSet errorformat=\ %#%f(%l\\\,%c):\ %m,%-G%.%#
CompilerSet makeprg=dotnet\ build\ --nologo\ --no-restore\ /clp:NoSummary
let &cpo = s:keepcpo
unlet s:keepcpo
I copied it in ~\vimfiles\compiler folder. And now to use is I just call :compiler dotnet followed by :make.
About My Blog
Whenever I get stuck doing something - the time comes to venture in the world of internet to find solution. In most cases I do find the solution, solve my problem and go on with my life. Then one day I am faced with the same problem. But now - I can't remember how the hell I solved it the first time. So the cycle begins again. Then I thought, what if I can remember all the those things? So here it is, my Auxiliary Memory. I decided to save all the problems and their solution in this blog so that I can get back to them when I need them. And the plus point is - so can everybody else.
Saturday, October 5, 2019
VIM dotnet core cli compiler script
Thursday, June 2, 2016
Converting Visual Studio Website to Web Application
Recently I had to convert an old visual studio website project to web application project because I needed to generate a class diagram of the project and visual studio 2013 didn’t let me generate one for website project. I google around and read article on how to do it. In most places it says to create a new web application project and then copy the files in the new project. Then right clicking the web application project will give you the option to “convert to web application”.
I followed the instruction and tried to do that. However, for some reason when I right clicked the new project I didn’t get any convert to web application item. Instead I got “convert to class library”.
So I thought I will manually make the conversions required. So I created a new web application project and added a webform to the project to see how it differs from the ones I already had from the web site project.
There were mainly three differences -
- The class in code behind file was under namespace.
- Each aspx page also had a associated designer.cs page with it.
- The header of the aspx pages had some different information.
Let’s take a sample website project structure which I will convert to web application. The structure of the project is as follows -
Website
- App_Code
- BLL
- GeneralBLL.cs
- AccountBLL.cs
- DAL
- GeneralDAL.cs
- AccountDAL.cs
- Masterpage.master
- Masterpage.master.cs
- Default.aspx
- Default.aspx.cs
- Account
- Login.aspx
- Login.aspx.cs
- Web.config
Now I will copy these files to my new web application project so that the structure looks like -
Webapplication
- BLL
- GeneralBLL.cs
- AccountBLL.cs
- DAL
- GeneralDAL.cs
- AccountDAL.cs
- Masterpage.master
- Masterpage.master.cs
- Default.aspx
- Default.aspx.cs
- Account
- Login.aspx
- Login.aspx.cs
- Web.config
One noticeable changes to the structure is that there is no more App_Code folder. Everything inside the folder was shifted to root or home folder.
One thing to note that it’s better not to overwrite the default Web.config file of the web application project. Instead copy the required segments from old config file to the new one.
Now, let’s start making all the changes to run the new project.
Adding namespaces to classes
As far my understanding goes, all classes in website application are place in a single (global) namespace (I might be wrong). But, web application uses namespaces to organize the classes.
Generally, any classes placed in the root directory have project name as their namespace. Classes that are under folders get the folder names appended with the project name to form their namespaces.
//Default.aspx.cs
namespace Webapplication
{
public partial class _Default
{
//.....
}
}
//Login.aspx.cs
namespace Webapplication.Account
{
public partial class Login
{
//.....
}
}
For other cs files (like GeneralBLL.cs, AccountDAL.cs), I created namespace according to their folder structure. So GeneralBLL class had namespace Webapplication.BLL, AccountDAL class had namespace Webapplication.DAL, and so on.
Adding designer class file
In web application project each webform page has an associated designer.cs file. This file is not needed for website projects. This file is used by VS to declare all the control variables as class variables. So, I have to add this file for each webform file. The name of the physical file have to match correctly (e.g. for Default.aspx - Default.aspx.designer.cs). Class name in both files have to match and both should be declared as partial. Also, namespace of both files should match.
Making changes ASPX headers
In an website project the header of Default.aspx page looks something like this -
<%@ Page Title="" Language="C#" MasterPageFile="~/MasterPage.master" AutoEventWireup="true" CodeFile="Default.aspx.cs" Inherits="_Default" %>
In an web applicaiton project the same file looks something like -
<%@ Page Title="" Language="C#" MasterPageFile="~/MasterPage.master" AutoEventWireup="true" CodeBehind="Default.aspx.cs" Inherits="Webapplication._Default" %>
Both are almost same, except for two changes. One is that the CodeFile parameter is changed with CodeBehind. And second is that the Inherited class is now under a namespace (In our case it’s Webapplication).
Interestingly when the changes in header is saved, visual studio automatically changes the designer file and add declarations for all the controls defined in Default.aspx file. This is a real time saver when there are a lot of controls in a page. Also this provides a indication that all the changes we made upto now actually works.
For aspx files under folders, website project names the class file with the foldername as prefix. For example, the class name for Login.aspx.cs file would be Account_Login since the file is under Account folder. For folders I created separate namespace like Webapplication.Account and rename the class as simply Login. This also has to be set accordingly in the aspx file header.
For masterpages same process have to be followed.
After the changes, the structure of Webapplication became
Webapplication
- BLL
- GeneralBLL.cs
- AccountBLL.cs
- DAL
- GeneralDAL.cs
- AccountDAL.cs
- Masterpage.master
- Masterpage.master.cs
- Masterpage.master.designer.cs
- Default.aspx
- Default.aspx.cs
- Default.aspx.designer.cs
- Account
- Login.aspx
- Login.aspx.cs
- Login.aspx.designer.cs
- Web.config
For the project I was working on, I had to change all the files in the project this way. It is indeed a hectic job, and sometimes I missed one or two files. However, building the application always produced errors so I could check for the missing files easily. But once I did all that changes, the project ran smoothly.
Saturday, October 17, 2015
Crystal Report with ADO.NET(XML)
Crystal Report is a great tool for reporting. I have used it couple of times to create reports. When I use crystal reports though, I like to keep presentation layer (that is the report file) and the data access layer separate. Therefore I use DataTable to fetch the data from database and load it to crystal report.
The code for fetching the data and loading to crystal report looks someting like this -
DataTable dt = GetDataFromDB();
using(ReportDocument rdoc = new ReportDocument())
{
rdoc.Load("/path/to/rpt/file.rpt");
//set datasource
rdoc.SetDataSource(dt);
//set parameters
rdoc.SetParameterValue("","");
//export to pdf
rd.Export(ExportFormatType.PortableDocFormat);
}
This does separate the data layer from presentation layer at runtime. But during crystal report design the report needed database as source to get the fields. This can be overcome by using XML as datasource. For that, we first need to convert our data to XSD. I have written a code snippet that does just that.
DataTable dt = new DataTable();
using(SqlCommand com = new SqlCommand())
{
using(com.Connection = new SqlConnection(_connectionString))
{
com.CommandText = "your sqlcommand";
using(SqlDataReader dr = com.ExecuteReader())
dt.Load(dr);
}
}
dt.WriteXmlSchema("xsd file name");
This code can easily be run using Linqpad or Notepad++ plugin cs-script
Once I have the XSD, I just need to add the file as data source by selecting ADO.NET (XML) and selecting the file.
Now, if the data type of any column of the query changes, it can be easily changed in the XSD file and the datasource in crystal report file can be refreshed. Even if the source database changes in future (like form MS Sql to Oracle or anything else), no changes are needed in the crystal report file.
Saturday, March 28, 2015
Handling QueryStrings in ASP.Net
Request.QueryString["param_name"] //or simpler Request["param_name"]
But if we keep accessing it this way throughout our code, soon the whole think would become very messy. What if we needed to change the name of the parameter at a later point. Then we have to dig through the code to replace all the instances where we accessed the parameter.
Another way would be to read and store the value of the parameter to a variable in page load and use the variable everywhere. But this would mean that the query string is parsed in every page load even if the value is not used for some particular post backs.
So, a better way would be to encapsulate the access to a function or property -
private string ParamName
{
get
{
return Request.QueryString["param_name"];
}
}
This is much better, now we can just call the property when we need it and keep our page load method clean. This does query the QueryString every time we call the property which we can easily avoid by storing the value in a variable during first call of the property-
private string _paramName;
private string ParamName
{
get
{
if(_paramName != null)
return _paramName;
else
{
_paramName = Request.QueryString["param_name"];
return _paramName;
}
}
}
But what if the parameter was not passed during page call? Then the code will throw a Null exception. The QueryString's Get method takes care of the. The method returns empty string if the parameter is not passed. So the best way to handle QueryString would be -
private string _paramName;
private string ParamName
{
get
{
if(_paramName != null)
return _paramName;
else
{
_paramName = Request.QueryString.Get("param_name");
return _paramName;
}
}
}
Now we can easily use the property in our code without facing any runtime error-
if(!string.IsNullOrEmpty(ParamName)) // use ParamName
Monday, December 1, 2014
Installing Arch Linux
However, this can also be a drawback. The beginners guide have so much information that you might get side tracked. Or, you might miss a step which needs to be followed to install arch. So, I thought it's better to make my own cheat sheet.
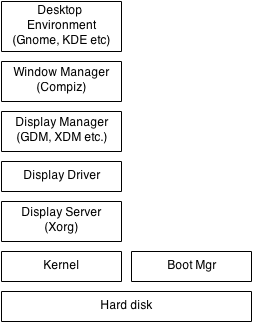
A simple understanding of how linux work, or the component which makes up a fully interactive linux environment is a plus for this type of installation. As I mostly used Ubuntu, I didn't have a good understanding of the components at work. But after I was able to install arch, I got a good idea about them.
The image on the right shows the components we need to be aware of. To install arch, we need to start from below. First we need to partition the hard disk. Then we will install the arch linux kernel. After that, we will install a Display Server. Then, if we don't want to use the default display drivers, we need to install the display drivers. After that, we will install the Desktop Environment. This will automatically install a Desktop Manger and Window Manager.
So, we need to follow these steps to install arch. Now, let's talk about them in more details.
1. Creating a Installation Media
So, we need to first download the iso of Arch from their site. Than we can just burn the image to a disk. I myself, however, prefer creating a bootable USB from the iso. So, I created a bootable USB from the iso using UUI. But turns out, this have some issues and so the system doesn't boot from the USB.So, I followed the other instruction given in the link above to create the disk. Since, I was using Ubuntu, I just opened up a terminal and created the live USB with the following command -
dd bs=4M if=/path/to/archlinux.iso of=/dev/sdx && syncDon't forget the sync command at the end. If you miss it, arch might not boot from the USB correctly. The first time I tried making the USB, it didn't work correctly.
Now we can use the media to boot to arch linux.
2. Partitioning The Hard Disk
We can partition the hard disk using MBR or GPT partitioning style. I prefer GPT as it is newer and has some advantages over MBR. More information on them can be found here.For the most basic setup, the hard disk need only two partition - one is root /, and the other is boot partition. For MBR partitioning style, only one partition (root) is enough.
Partitioning can be done using any of the available tools, here we will use cgdisk. cgdisk is a GPT partitioning tool. We can startup cgdisk using the following command.
cgdisk /dev/sdaIf the disk is already partitioned using MBR or not partitioned at all, it will ask to convert the disk to GPT partition. Pressing enter will convert the disk to GPT partition and show a list containing the partitions available in the hard disk. You can select partitions using up/down keys and select actions using left/right keys from the keyboard.
If the drive is not partitioned, there will be only one entry in the partition list with partition type unallocated. By selecting the entry and selecting [New] command from below we can start creating partitions. We will create three partitions - first one is for boot (for BIOS boot, code is ef02 and for EFI boot, code is ef00), second one for swap (code is 8200) and the last one for root (code is 8300). After we finish creating the partition, the screen will look something like below -
We have to make sure to "write" the partition information before quitting cgdisk or we have to do it again.
3. Mounting the partitions
After creating the file system we have to format and mount them. Assuming our hard drive is /dev/sda, we have invoke the following commands to format and mount the file systems -mkfs.ext4 /dev/sda3 mount /dev/sda3 /mnt mkfx.fat -F32 /dev/sda1 mkdir /mnt/boot mount /dev/sda1 /mnt/bootWe also have to make the swap partition -
mkswap /dev/sda2 swapon /dev/sda2
4. Connecting to Network
For wired connection the system should automatically connect to a dhcp network. Nothing further needs to be done. For connecting to a static IP network it's best to refer to the Beginners' Guide.For wireless/wifi connection we have to first know the name of the wireless card. We can check it using -
ip linkNow we can connect to the wifi network using -
wifi-menu <card name>Now, we need to follow the instruction and provide the asked information to connect to a wifi network.
5. Installing Arch Kernel
Now we will install the base kernel using the following command -pacstrap /mnt base base-develThis will install all packages from base and base-devel group. To customize what packages will be installed we can use -i flag with pacstrap. This will prompt to select the packages we want to install.
6. Creating file system table
The file system table defines how the partitions will be mounted in the system. To generate it run the following command -genfstab -U -p /mnt >> /mnt/etc/fstab vi /mnt/etc/fstab
7. Configure Base System
After this, we need to configure the base system. For that we need to chroot to the system -arch-chroot /mnt /bin/bash
Configure Locale
Now we will configure system locale. We have to open /etc/locale.gen file and uncomment the line en_US.UTF-8 UTF-8. Then we will run the following command to generate locale.locale-genThen we will create /etc/locale.conf -
echo LANG=en_US.UTF-8 > /etc/locale.confAnd we will set the LANG variable -
export LANG=en_US.UTF-8
Configure Time
We will create a symbolic link to our subzone using the following command -ln -s /usr/share/zoneinfo/Zone/SubZone /etc/localtimeWe have to change Zone and SubZone with our zone information.
Then we will set the hardware clock mode -
hwclock --systohc --utc
Set Hostname
We can change the machine hostname by -echo host_name_here >> /etc/hostname
8. Install CPU Microcode
For intel based cpu's we have to install the microcode update (this is optional, we can run the system without microcode update). It is better to install it before installing boot loader because some boot loaders (such as grub) can load microcode at boot.pacman -S intel-ucode
9. Install Network Components
For wired connection we don't need to do anything. We just have to configure the network again as above after restarting the system. For wireless connection, we need to install some packages to be able to connect as we did before -pacman -S iw wpa_supplicant dialogAfter this we can connect to wifi network using wifi-menu.
10. Install Boot Manager
We will install grub as it automatically loads intel-ucode. We have to run the following commands to install and configure grub -pacman -S grubTo configure for EFI (64 bit)-
grub-install --target=x86_64-efi --efi-directory=$esp --bootloader-id=arch_grub --recheckTo configure for BIOS -
grub-install --target=i386-pc --recheck /dev/sdaThen we need to create grub.cfg for both case -
grub-mkconfig -o /boot/grub/grub.cfgAfter this we need to reboot the computer and log into our newly installed OS for further installation process. To unmount the partitions and reboot -
umount -R /mnt reboot
11. Install Display Manager
After rebooting we will find ourselves in a arch linux kernel. Now we have to install the Graphical user interface. For that we have to first install a Display Manger. The most common display manager is Xorg which we can install using -pacman -S xorg-server xorg-server-utils
12. Install Display Driver
We can use the default driver if we want. But we can also install vendor provided drivers.For intel -
pacman -S xf86-video-intel libva-intel-driver libva lib32-mesa-libglFor ATI -
pacman -S xf86-video-ati mesa-libgl lib32-mesa-dri lib32-mesa-libglFor NVidia the process varies for models. So it's better to visit Arch Wiki for installation instructions.
13. Install Desktop Environment
Now, we are ready to install the actual Desktop Environment. To install GDM -pacman -S gnome gnome-extraThen we need to set up GDM to start at system boot -
systemctl enable gdmTo install other Desktop Environments we can refer to Arch Wiki.
After this we can reboot to log into our installed Desktop Environment.
14. For Laptops
If we are installing arch in laptop, we have to install touchpad driver to make it work.pacman -S xf86-input-synapticsAfter installing driver we need to restart the laptop.
For better power management we can install TLP which works out of the box.
pacman -S tlp
15. Misc
The sound driver should work out of the box. However, to be able to play music we might need to install Codecs. GStreamer is a good codec which can be installed using -pacman -S gstreamerHowever, the old version of GStreamer is still widely used. So we can also install the old version using -
pacman -S gstreamer0.10
Monday, November 17, 2014
Compiling Monodevelop in Ubuntu using git repo from behind proxy
Prerequisites
First thing first, the prerequisites. Open up a terminal and install this packages -sudo apt-get install mono-complete mono-devel mono-xsp4 gtk-sharp2 gnome-sharp2 gnome-desktop-sharp2 mono.addins mono-tools-devel git-core build-essential checkinstall
For the compilation to succeed you will also need to import mozilla certificates. Run the following command to import the mozilla roots -
sudo mozroots --import --sync --machine
The --machine flag is only needed if you use sudo make to compile.
Cloning the Git
Now go to the folder where you want to clone the git. Here I have used /opt. Make sure your user has right permission to that folder. You can give permission using the following command -chmod 777 -R /opt
If permission is right, then run the git clone command-
cd /opt git clone git://github.com/mono/monodevelop.git
if you are behind proxy use https-
git clone https://github.com/mono/monodevelop.git
This will only clone monodevelop. We need to clone the submodules using another command. But if you are behind proxy, first you need to change the git urls to use https. For that open up the file .gitmodules and replace all git with https. Make sure the url ends with .git. You can easily do it by opening the file in vi and running the following ex command -
:%s/git:/https:/g
Now clone the submodules
cd monodevelop git submodule init git submodule update
If you are behind proxy you need to change git url in another .gitmodule file which will be cloned in /opt/monodevelop/main/external/monomac/.gitmodules after the update.
Compile & Install
Now we will compile and install monodevelop. First we run the configure script. Here I have used the default location to install monodevelop. You can pass --prefix=<location> to install monodevelop in other location../configure --select --profile=stable
After this we are ready to build.
make
If you have given the --select flag, you will be asked to select the modules to make. I have skipped all them since some of the addons are broken now. For example, valabinding addon needs libvala-0.12 and mine had later version installed which is not supported. After compilation is successful, run the following command to install monodevelop.
checkinstall
This command puts the program in the package manager for easy removal later.
Misc.
Some other packages that might need to be installed are.sudo apt-get install libglade2.0-cil-dev sudo apt-get install libtool sudo apt-get install autoconf
Thursday, November 13, 2014
How to list DB Provider Factories registered in machine with C#
To get the list just fire up LINQPad. Select "C# Statement(s)" from "Language" dropdownlist. Paste the following line in textarea and run.
System.Data.Common.DbProviderFactories.GetFactoryClasses().Dump();
You will be presented with the details of all DB Provider Factories in your machine.
Tuesday, November 11, 2014
Installing VoraX (A vim based Oracle IDE) on Windows
The things we need for vorax to be installed are -
- Oracle Sql Client
- Gvim 7.4
- Ruby
- Ruby Dev Tools
- And last, vorax itself
Lets start with Oracle Client. Vorax uses sqlplus to connect to Oracle database. So it needs to be installed and it's path added in Environment Path. I already had it installed in my machine and no further configuration was needed for it.
Next up, Gvim. Just download gvim from it's official website and install it. But the problem with that is gvim requires msvcrt-ruby192.dll. But I was unable to find a windows ruby installer that contained this specific version of the dll. So I downloaded custom gvim build from wyw.dcweb.cn which uses msvcrt-ruby200.dll. I found this link in this stackoverflow discussion. After downloading the custom build I replaced the original gvim74.exe and vim74.exe with the custom ones.
Now, it's time to install ruby. Downloaded Ruby 2.0.0-p594 and extract it in a local directory. Lets call it RUBY_DIR. Now put RUBY_DIR\bin in Environment Path.
After this we need to set up Ruby Dev Tools. Download it and extract to some local path. Let's call it's location DEV_DIR. Now open cmd and goto DEV_DIR. Execute the following command -
DEV_DIR>ruby dk.rb init
This will create a file named config.yml in DEV_DIR. Open the file with notepad and insert the RUBY_DIR location at the end of it if the line already doesn't exist and save it. Now run the following command -
ruby dk.rb install
This will install devkit.rb file in RUBY_DIR\lib\ruby\site_ruby.
Now lets start installing VoraX. First we install some ruby gems required by VoraX. For that Open a cmd and goto RUBY_DIR\bin. Now it's time to install some gems required by VoraX. Execute the following command in cmd -
RUBY_DIR\bin>gem install vorax --no-rdoc --no-ri
If you are behind a proxy set up HTTP_PROXY variable first -
set HTTP_PROXY=http://<proxy address or IP>:port
Now download vorax plugin and extract it's contents in %userprofile%\vimfiles. Make sure %userprofile%\_vimrc file contains the line "filetype plugin on".
Now when you run gvim with vorax installed. Further information can be found
- vorax.txt file in downloaded plugins doc folder
- https://github.com/oneclick/rubyinstaller/wiki
Monday, November 10, 2014
Why Html.BeginForm Have to be used with using?
My exact question is that why we need to declare Html.BeginForm with using like below but for other Html extensions we don't.
@using(Html.BeginForm())
{
...
}
Well, the answer is actually pretty simple. The BeginForm method render a html form tag. When the method is called it render only the first part of the form.
<form action=""...>
After that any number of extension methods can be called. So how would the system know when to close the form. And that's why using is used. When system goes out of the using scope, it tries to dispose the enclosing object. This is when the object renders the closing form tag.
This can be verified by going to the declaration of BeginForm. All the BeginForm methods return an object of Type System.Web.Mvc.Html.MvcForm. And MvcForm implements IDisposable interface.
Friday, November 7, 2014
How to add software source in ubuntu from behind proxy
apt-add-repository ppa:user/repositoryHowever, recently when I tried to add a ppa using the above mentioned command from behind proxy, it didn't work. So I had follow a longer way to add the software source.
First goto launchpad.net and search for the software whose source you want to add. Then click on the Technical details about this PPA link, which will show you source.list entries. Select you ubuntu version from the dropdownlist/combobox. Then copy the first line. Picture shown below -
Now you can add this copied source to your ubuntu software sources in two ways. One way is to run the following command from you terminal -
apt-add-repository 'deb http://myserver/path/to/repo stable myrepo'Or you can just use the gui. For that open up and goto Edit>Software Sources...>Other Sources and clicking the add button. Paste the link on the textbox and click Add Source.
This will only add the source to your ubuntu. But for ubuntu to trust the source you need to add the gpg key of that source. For that you need to first save the key to you machine. Click on the Signing Key link shown in first picture. Then click on the first link on the next page. This will show you some text. Now from that page copy only the part shown below -
-----BEGIN PGP PUBLIC KEY BLOCK----- Version: SKS 1.1.4 Comment: Hostname: keyserver.ubuntu.com mI0ETnBj5QEEAOOa9QvcobiU9ulHUlwX/MOzhA2aH52zQ4kIk58PBk+5wM1gjLMUEhXAjJu7 0pQLsm2Te7q25ljYyV6LAN0f0FaFA1fx9P9oQF5dS208Gb5S4b434GieMmgAOC8Tidq s8c8zTsaufaRaqPrZEGgj9q/dQb88mua5cM9DswHABEBAAG0I0xhdW5jaHBhZCBQUEEgZm9y IEViZXJoYXJkIEJlaWxoYXJ6wECACIFAk5wY+UCGwMGCwkIBwMCBhUIAgkKCwQWAgMB Ah4BAheAAAoJEEi2gD6Dnsu+AlIEAIbeU2/crDbYp/wRrpBsvBw44UtIKHYsRXLESWF2+kYk 8jQBfjnRUxoC3PFaoMlWaWJh7Jv5MWkSb0aws9DaRzFVcNu6/SDoj7t2/mXLgnDMQryw9CkL gYcUcNlWvrgKicgqo9/v2L2FH2393i9blMJz7216j28NGjgoKeOLTWdv =viCD -----END PGP PUBLIC KEY BLOCK-----Now create a text file and save this text with any name in you machine. Again you can do it two ways. First on goto the saved file location from terminal and run the below command -
sudo apt-key add <file>Or second way, goto the Software Sources window as mentioned above. Then goto the Authentication tab, click on Import Key File.. button and browse and select the save file. This will add the signing key of the source to your ubuntu.
Now all that's left is to update you package repository with sudo apt-get update and you are ready to install any software from the new source you added.
My Most Used Vim Commands
Lets start with the basics :).
Moving arround:
| Command | Description |
|---|---|
| h | move the cursor left |
| j | move the cursor down |
| k | move the cursor up |
| l | move the cursor right |
Moving arround (advance):
And some advance command for moving arround..| Command | Description | Remarks |
|---|---|---|
| w | move cursor to the next word | W does the same but considers special characters part of word |
| b | Same as w, but works backwords | B is same as W, but works backwords |
| e | Same as w, but cursor moves to the end of word | Same as W, but cursor moves to the end of word |
| % | Go to the matching bracket | |
| ( | Goto start of sentence | |
| ) | Goto end of sentence | |
| ^ | Goto first printable character of the line | |
| 0 | Goto start of the line | |
| $ | Goto end of the line | |
| H | Move cursor to the first viewable line | |
| L | Move cursor to the last viewable line | |
| zz | Move window such that the cursor comes to the middle of the screen |
Manipulating Text:
| Command | Description | Remarks |
|---|---|---|
| u | Undo last action | |
| x | delete character under cursor | |
| dw | delete one word | can be used with other movement commands |
| dd | delete whole line | |
| I | Goto start of the first printable character on the line and switch to insert mode | |
| a | Switch to insert mode after the character under cursor | |
| A | Goto end of line and switch to insert mode | |
| o | insert line below current line and goto insert mode | |
| O | insert line above current line and goto insert mode | |
| y | Copy/yank character under cursor | yy copies current line |
| p | paste copied text | |
| ~ | change letter case | |
| v | turn on selection mode | you can use movement commands to selecte texts in visual mode |
Searching
| Command | Description | Remarks |
|---|---|---|
| / | searches the following text starting from the cursor and forward | type the text to be searched after the / and press enter |
| n | goto the next occurence of the searched text | |
| N | goto the previsou occurence of the searched text |
Miscelleneous:
| Command | Description |
|---|---|
| zo | Open folded lines |
| zc | fold the foldable region the cursor is currently in |
Ex Commands
Now some ex commands. (These commands are given using :) -| Command | Description |
|---|---|
| :w | save file |
| :q | quit vim |
| :%sort | sort all lines in the files lexicographically |
| :nohl | turn off highlighing of searched items |
| :syntax on | turn on syntax highlighting |
| :set ft=<filetype> | sets filetype of the file for syntax highlighting |
| :set wrap | turns on wrapping of lines |
| :set nowrap | turns off wrapping of lines |
Phew... the list got bigger than I expected. And these are only the ones I use in my regular vim activity. Furthermore, I consider myselft just a novice of vim :p.
Tuesday, November 4, 2014
How to upgrade kernel on Ubuntu
uname -r
To find out which version is the latest go to www.kernel.org.
To install the latest version you need to download the images. For that go to kernel.ubuntu.com/~kernel-ppa/mainline and open up the folder that matches the version number you found in www.kernel.org.
You need to download three files from the list. For 32 bit they are -
linux-headers-***-generic_***_i386.deb linux-headers-***_***_all.deb linux-image-***-generic_***_i386.deb
For 64 bit they are -
linux-headers-***-generic_***_amd64.deb linux-headers-***_***_all.deb linux-image-***-generic_***_amd64.deb
After downloading the files copy them to a temporary folder with no other deb files and run the following command from terminal -
sudo dpkg -i *.deb
This will install the new kernel. Restart you machine and uname -r to confirm you are running the latest kernel.
To uninstall the old kernel you could just use ubuntu-tweak. Install it with -
sudo apt-get install ubuntu-tweak
After installing ubuntu tweak, run it and open janitor. Do a clean and it will uninstall the old kernel for you.
Monday, November 3, 2014
Cannot launch/debug ASP.NET/ASP.NET MVC on MonoDevelop on Ubuntu 14.x
The problem is that the PPA provides local mono but does not provide mono-xsp4 because of compatibility issues. So first we need to install mono-xsp4
sudo apt-get install mono-xsp4Then we need to tell MonoDevelop to use User's mono runtime instead of the local one to run the project. For that we need to goto Edit>Preferences.. from MonoDevelop menu and select Mono*** (/usr) and set it as default.
Now if you try to run the project, it will run but you will get an error page saying System.MissingMethodException: Method not found: 'System.Configuration.IConfigurationSectionHandler.Create'. The problem is that mono-xsp4 cannot locate some dll files when run from MonoDevelop probably because the launcher script /opt/monodevelop/bin/monodevelop-launcher.sh set some environment variables before starting MonoDevelop.
To get around it we need to run MonoDevelop itself with the users mono runtime. You can see in the above picture that even though we have set users runtime as default, monodevelop was using the local mono to run itself. So, lets run monodevelop with users mono runtime. First copy the monodevelop script that monodevelop-launcher.sh calls to run monodevelop to someplace with easier access.
cp /opt/monodevelop/bin/monodevelop ~/Desktop/monodevelopNow modify the value of EXE_PATH to directly point to MonoDevelop.exe
EXE_PATH=/opt/monodevelop/lib/monodevelop/bin/MonoDevelop.exeSave the file.
Now run monodevelop script from desktop and monodevelop will start using users mono.
./monodevelopIf you try to run web application now xsp4 will successfully run them and you can also debug them. I have tested it with ASP.NET MVC 2 Project. You can also verify that monodevelop is using users mono runtime by going to the above mentioned screen.
P.S. If any registry access error is shown then we need to create the following directories and set their permissions.
sudo mkdir /etc/mono/registry sudo mkdir /etc/mono/registry/LocalMachine sudo chmod g+rwx /etc/mono/registry sudo chmod g+rwx /etc/mono/registry/LocalMachine
Friday, October 31, 2014
Batch File Renaming with Windows PowerShell
I have been in situations where I needed to batch rename a lot of file. There are a lot of tool you can find on internet that can do this. But why go through all those software when you have one option available in windows ready for you to use.
Say Hello to PowerShell. To open it just type "powershell" in command prompt or in start menu.
Here are a few things you can easily do with powershell
Change File Extension
Have some .log whom you want to change to .txt? Just run the following command -
dir *.jpeg | rename-item -newname { $_.name -replace ".log",".txt" }
dir command gets the list of files in the current directory. The | (pipe) character passes this list to rename-item command which takes each of the file and replaces it's extension
Appending File Extension
You can append file extension to multiple files which don't have file extension in their name
dir | rename-item -newname { $_.Name +".jpg" }
Rename File With Increasing Number
This one's a bit complicated than the other two. It uses a variable to rename the files.dir *.jpg | ForEach-Object -begin { $count=1 } -process { rename-item $_ -NewName "image$count.jpg"; $count++ }
Accessing Physical Hard Disk Partition From Virtualbox Guest
- Run virtualbox with admin privilege.
- First we need to find the partition number. For that we need to run the following command.
"c:\Program Files\Oracle\VirtualBox\VBoxManage.exe" internal commands listpartitions -rawdisk "\\.\PhysicalDrive0"
- This will show the list of partitions (We need to run command prompt as administrator also for this to work). For my case
Number Type StartCHS EndCHS Size (MiB) Start (Sect) 1 0x07 0 /32 /33 44 /190/18 350 2048 2 0x07 44 /190/19 1023/254/63 204450 718848 3 0x07 1023/254/63 1023/254/63 66560 419432448 4 0x07 1023/254/63 1023/254/63 205578 555747328
- Now we need to create a .vmdk file that will point to the partition we need. I am going to
attach mine with partition 4.
"c:\Program Files\Oracle\VirtualBox\VBoxManage.exe" internal commands createrawvmdk -filename "E:\VirtualboxVDIs\rawedrive.vmdk" -rawdisk "\\.\PhysicalDrive0" partitions 4 RAW host disk access VMDK file E:\VirtualboxVDIs\rawedrive.vmdk created successfully.
- Bingo :). Now we need to attach the .vmdk file to a guest OS. Need to run VirtualBox Manager with admin privilege also.
- Select the guest OS from virtualbox manager and goto its settings
- Select storage tab and add the vmdk file to the SATA controller.
- Now startup your guest OS and you will find your hard drive their
One problem with this is that you cannot mount the hard drive in both guest and host at the same time. If your host is windows just remove the drive letter associated with the partition from device manager to unmount it.
Details can be found in this link
Thursday, October 30, 2014
You don't have permission error in Apache in CentOS
The Problem
<VirtualHost *:80>
DocumentRoot "/home/anjan/workspace/mfs"
ServerName anjan-centOS
<Directory "/home/anjan/workspace/mfs">
Options Indexes FollowSymLinks MultiViews
AllowOverride All
Order Deny,Allow
Allow from all
</Directory>
</VirtualHost>
I also disabled SElinux as was mentioned in some articles but in vain. If anyone could help me out it would be much appreciated.
The Solution
ls -l /home/showed
drwx------. 28 anjan anjan 4096 Jan 21 13:19 anjanso I changed the permission with this command
chmod -R 770 /home/anjan ls -l /home/ drwxrwx---. 28 anjan anjan 4096 Jan 21 13:19 anjani found out under which user my apache is running from this thread. It was running under user "apache" so I added user "apache" to group "anjan" with this command.
usermod -G anjan,apache apacheafter that voila. No more Forbidden error.


